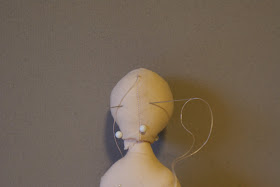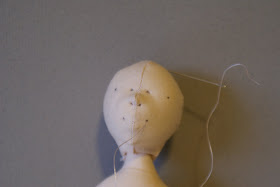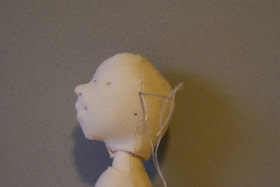
Step One: Marking the Face
To start off, make sure you have a very firmly stuffed head. Try to make sure you have stuffing filling out the nose. You can mold the head with your hands to get the shape of head that you find pleasing.
For the placement of features many books on drawing the figure and portrait painting are good resources for facial feature placement. For a more childlike face, which I am working on here today, you want to place the eyes on a horizontal line that is at the halfway point of the face. The eye width should be the same distance as the space between both eyes. Since I generally work on small doll heads I use a regular sharp pencil to mark the needle sculpting points. Many doll artists use fade away marking pens but I find them to spread too wide to give me the exact points I need to work on a small head. The pencil marks can be later incorporated into the coloring and shading of the face. When I make a mistake in marking I just erase the mark even though it often leaves a messy smudge. I have been told that you can use scotch tape to remove this smudge but have not tried this technique yet. In this particular example I am using a fine woven muslin that I hand dyed. These needle sculpting techniques can also be utilized on other cloths used for doll skin such as doe suede.
Place one dot on the eye line at the inner corner of each eye and on the outer corner of each eye. Remember to make the width of each eye the same distance as the width that each eye is apart from each other.
Next place a small dot where each nostril should be. The nose should be placed half way on the face between the eye line and the chin.
Next place a small dot where the outer corner of each side of the mouth will be. The mouth line should be half way between the nose and the chin. The corners of the mouth should be placed on that horizontal mouth line. They should be vertically aligned with the center point of each eye. Sometimes I may move these points just a touch closer to each other than that for a more pleasing effect.


If you are adding ears to your needle sculpted head you will need to make placement dots for those. You need to make one placement dot on the eye line and one placement dot at the nose line on each side of the head.
Step Two: Preparing to Needle Sculpt

I generally use nymo thread in a color slightly lighter than the “skin” fabric but many dollmakers do not prefer to use this thread because it is multi-ply and can tangle while you are working with it. You can use silamide, strong carpet thread, or strong craft thread.
Thread your needle, I usually use John James Darners (number 7 or 9). For a larger head you will need longer needles. I have used long doll sculpting needles but they often are too thick and leave too large holes so when using them I will use the long needle to get to where I want to be and then switch to a darner to do the actual needle sculpting. I have been told that milliners needles are better for this but have yet to try them.
Use a single thread always when needle sculpting. DO NOT double your thread in the needle. Make a knot on one end and bring the needle from inside the neck part of the head into the back of the head. Make a tacking stitch so that the knot doesn't pull through
Step Three: Sculpting the Nose

Make sure you have enough stuffing in the nose area so you have a firm nose to work with. Bring the needle into one of the nostrils. Take a small stitch and then bring it to the back of the head. Do not pull tightly, just a little tug, then take a tacking stitch at the back of the head.

Do the same to the other nostril. You may want to repeat the process twice on each side to make a nice indentation in the nostrils.
Step Four: Starting to sculpt the eyes

Bring the needle from the back of the head to the front of the head in the corner of one eye. Take a small stitch and bring it back to the back of the head. Do not pull to tightly. Just give it a little tug. Take a tacking stitch at the back of the head.

Do the same process for the inner corner of the other eye. Repeat the process twice for each eye.
Step Five: Sculpting the Eyes and Mouth

Make sure your cheeks are firmly stuffed. Bring the needle from the back of the head to the front of the head in one corner of the mouth.

Take a small stitch and then run the needle under stuffing in the cheek and out of the face at the outer corner of the eye. This is where you want to give a good little tug to develop a nice smile and nice cheek.
Take a small stitch at the outer corner of the eye and bring the needle to the back of the head. Give the thread a bit of a good tug and take a tacking stitch at the back of the head.
This will give a nice shape to the cheek and to the eye.
Repeat the process for the other eye. Repeat the process for both eyes and cheeks twice.
Step Six: Giving Shape to the Head

Bring the needle from the back of the head to the side where you placed a mark for the ear at the eye line. Take a small stitch.

Bring the needle to the other side of the head at the mark for the ear at the eye line. Take a small stitch.
Go back and forth a few times until you have a nice shape to the face then go to the back of the head and take a tacking stitch. Run the needle back and forth in the back of the head a few times until you feel the thread is secure before you cut the thread off.
If you are not adding ears you are all set to start adding details to your face with watercolor pencils, pastels, or what ever art supplies you use to add color and depth to your needle sculpted faces!
THE PHOTOS AND WRITINGS IN THIS TUTORIAL ARE COPYRIGHTED AND MAY NOT BE REPRODUCED WITHOUT PERMISSION.
MARLA NIEDERER
ORSINI'S ANGELS
2011


Nice tutorial Marla!
ReplyDeleteVery clear. Thank you for showing us your process!
Lotus
I am glad you enjoyed it!
ReplyDeleteWell written tutorial.
ReplyDeleteVery good tutorial Marla, Very clear
ReplyDeletethank you for sharing! so hard to find clear tutorial!
ReplyDeleteYour pin dolls are beautiful.
ReplyDeleteWhat a wonderful tutorial! I found you through Mary Ann on A Cloth Doll Maker's Diary.
ReplyDeleteVery nice! Do you sell the pattern?
ReplyDeleteI am glad you enjoyed the tutorial. I am not selling patterns at this time but I am teaching online classes on http://www.aforartistic.com/classes/open-classes/claudette-a-cage-doll-marla-l-niederer-cloth-doll-artist.html
DeleteThank you for your interest
warm hugs,
Marla
I would like to make female faces which show age and life experiences. How do I make wrinkles on my dolls face? Thank you.
ReplyDeleteThank you so much for taking the time to share.
ReplyDeleteHI Maria, I finished my old Lady Can Can Dancer. Guess I should send a picture to you. She didn't turn out bad.
ReplyDeleteThanks for this post, I have Printed it off and will put it my book that I save all the important things thathel[ me with my dolls.
Hugs
NJ